You can personalize the salutation and the sender name. In this article you will learn how to customise the salutation and sender name in the eCard itself and within the email.
Here you will find a short video tutorial on the descriptions below:
Adjusting the salutation in the eCard
Open the editing mode of your desired eCard and then stay on the eCard tab. In the automatically generated greeting text you will now see the term [Salutation]. This term specifies that the salutation within the eCard is automated and pre-defined by you.

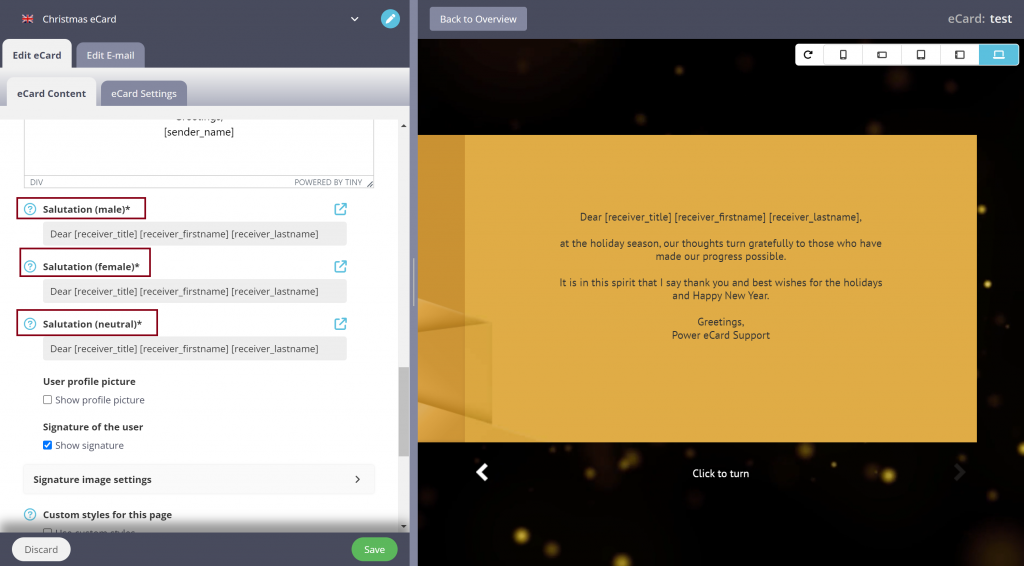
The personalized salutation is defined in three fields below the greeting text. In the fields Salutation (male)*, Salutation (female)* and Salutation (neutral)*. You can now define how your recipients are addressed by adding or deleting [receiver_title], [receiver_firstname] or [receiver_lastname].
If you want to address your recipients by their first name, for example, the form of address could be “Dear [receiver_firstname]“, while the form of address by their last name can be expressed by “Dear Mr. [receiver_lastname]“. This process is repeated for all salutation fields. Finally, save your adjustments at the top left.
Delete/Restore eCard Salutation
If you do not want an automated salutation in the eCard, you can simply delete the term [salutation] from the greeting text and write your own salutation. This salutation will then apply to all recipients of this eCard.
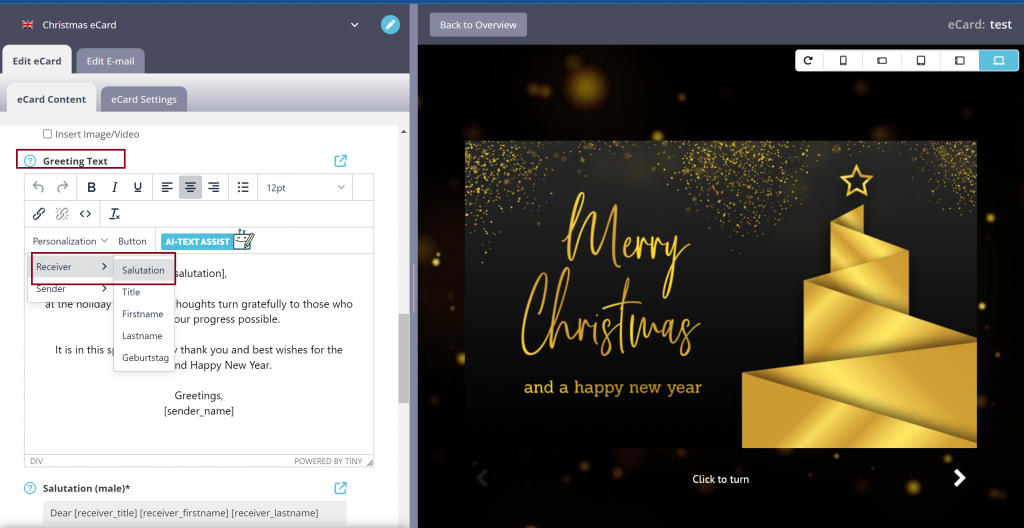
If you want the salutation to be automatically personalized again in a later mailing, you can add it back in the greeting text. To do this, click on Personalisation > Receiver > Salutation. The term [salutation] is now available again and the salutation can be defined as described in the previous section. Then save your changes.
Adjusting the salutation in the Email
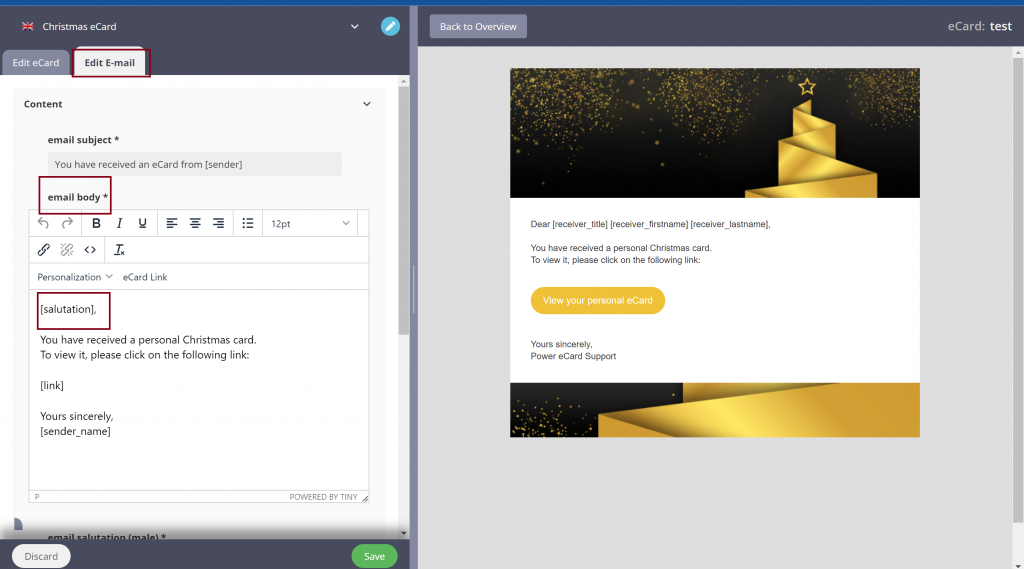
Open the editing mode of your desired eCard and go to the tab E-mail. In the automatically generated email body you will now see the term [salutation]. This term determines that the salutation within the Email is automated and pre-defined by you.
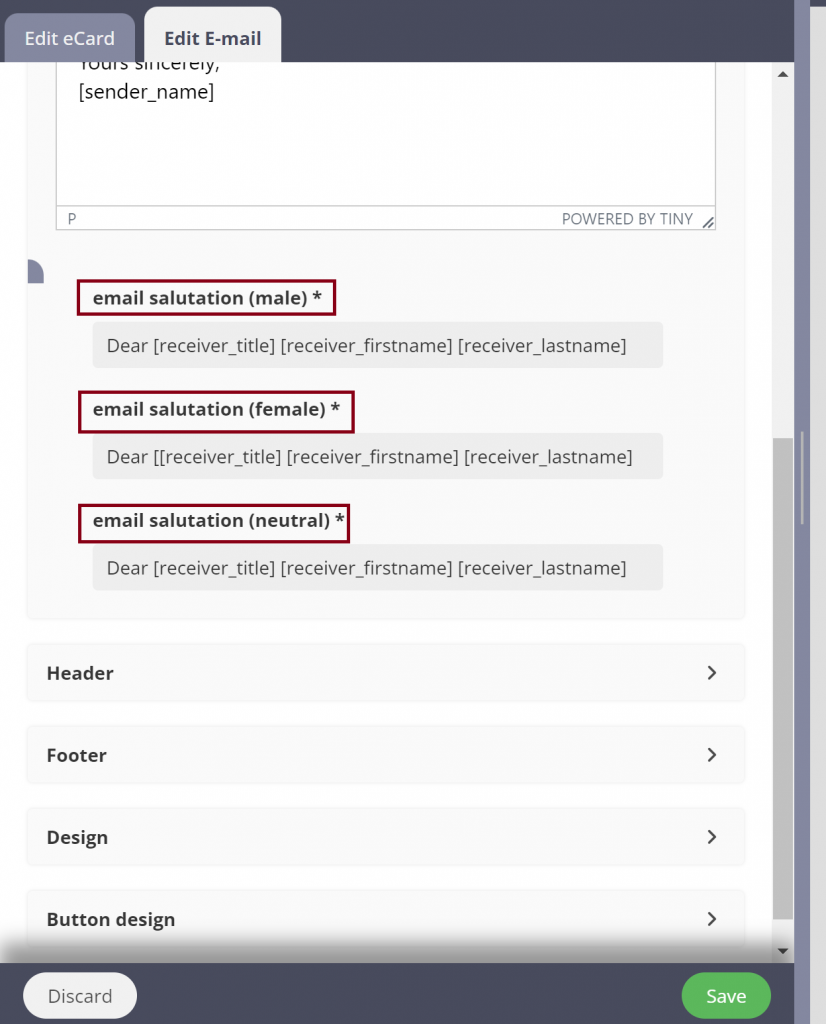
The personalized salutation is defined in the three fields below the e-mail body. In the fields Salutation (male), Salutation (female) and Salutation (neutral)* you can now define how your recipients are addressed by adding or deleting [receiver_title], [receiver_firstname] or [receiver_lastname]. Then save your changes.
Delete/restore Email salutation
If you do not want an automated salutation in the mail, you can simply delete the term [salutation] from the greeting text and write your own salutation. This salutation will then apply to all recipients of this eCard.
If the salutation is to be automatically personalised again in a later mailing, you can add it back in the email body. To do this, click on Personalisation > Receiver > Salutation. The term [salutation] is now available again and the salutation can be defined as described in the previous section. Then save your changes.

Define sender name
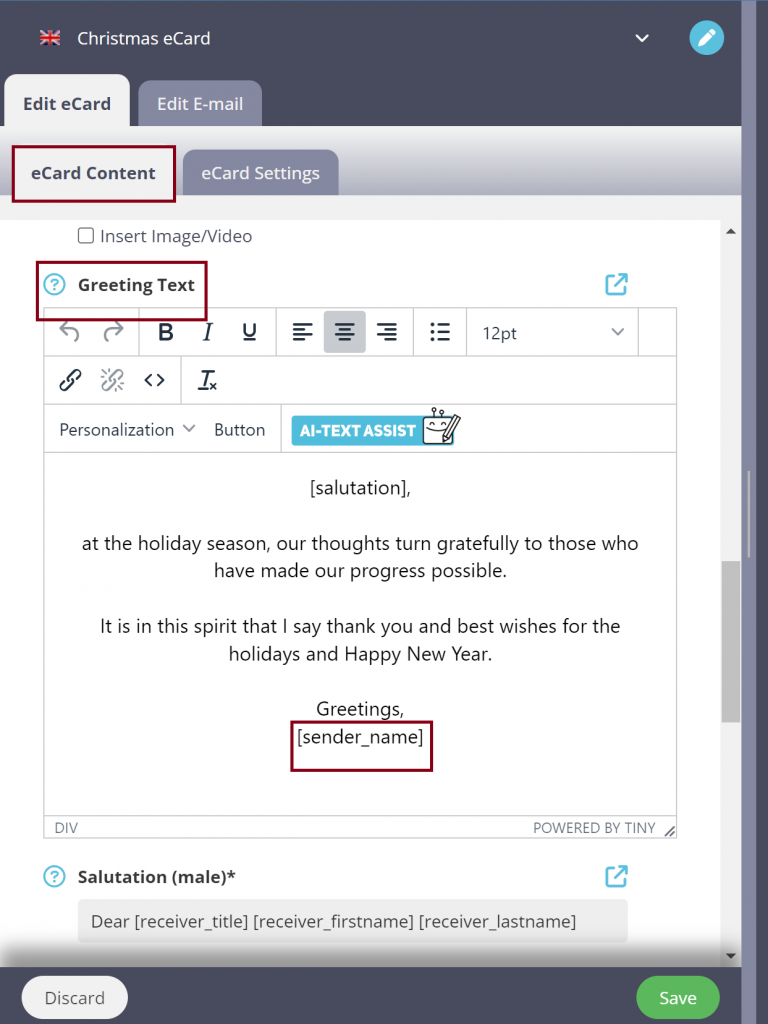
Open the editing mode of your desired eCard and then stay in the eCard tab. In the automatically generated greeting text you will now see the term [sender_name]. This term determines that the sender name within the eCard exactly matches your user name.
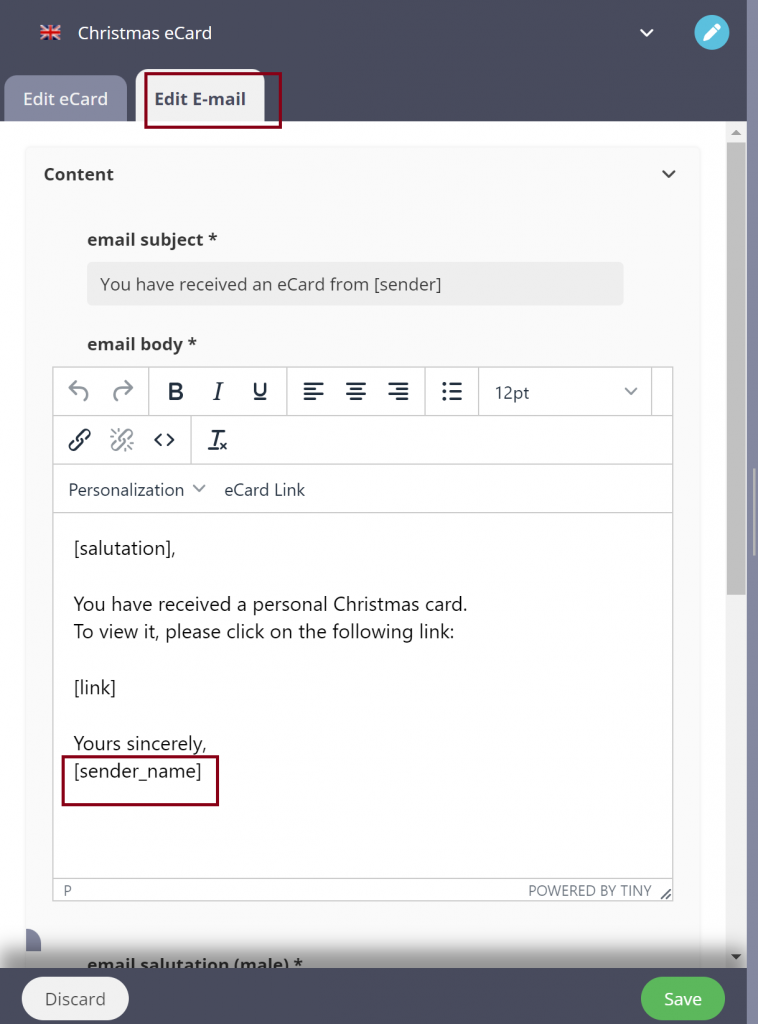
The same principle applies to the sender name within the email body. You can find it in the editing mode of your eCard in the tab Email and email body.
Delete/restore sender name
The automatic display of the sender name can be cancelled by deleting the term [sender_name]. This allows you to manually enter an alternative such as “Your Marketing Team from XY”. This closing phrase then applies to all receivers of your eCard.
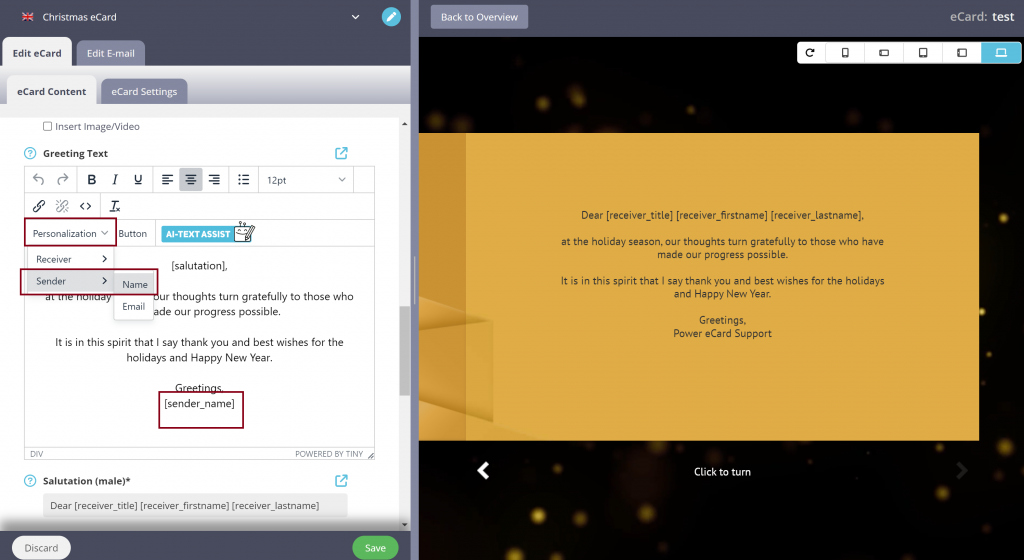
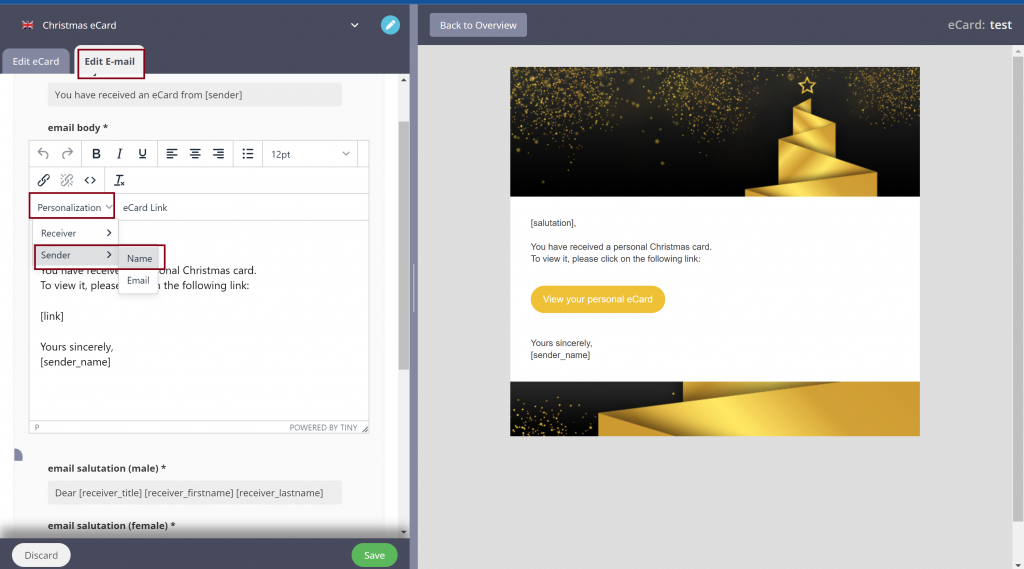
If you want the sender name to be automatically generated from your user name again in a later mailing, you can add it back in the greeting text. To do this, click on Personalization > Sender > Name. The term [sender_name] is now available again. Then save your changes.
The same principle also applies to the sender name within the email body.
Change display name
You have the option to permanently change the display name within your profile.
To do this, click on Profile > My Profile in the top right menu bar.

In the edit mode of your profile, you now have the option to change the display name. Save your changes.


