One of our basic templates is the folding card. With the help of this manual you will learn how to use and fill this template in an optimal way to create your personal eCard.
1. Create eCard
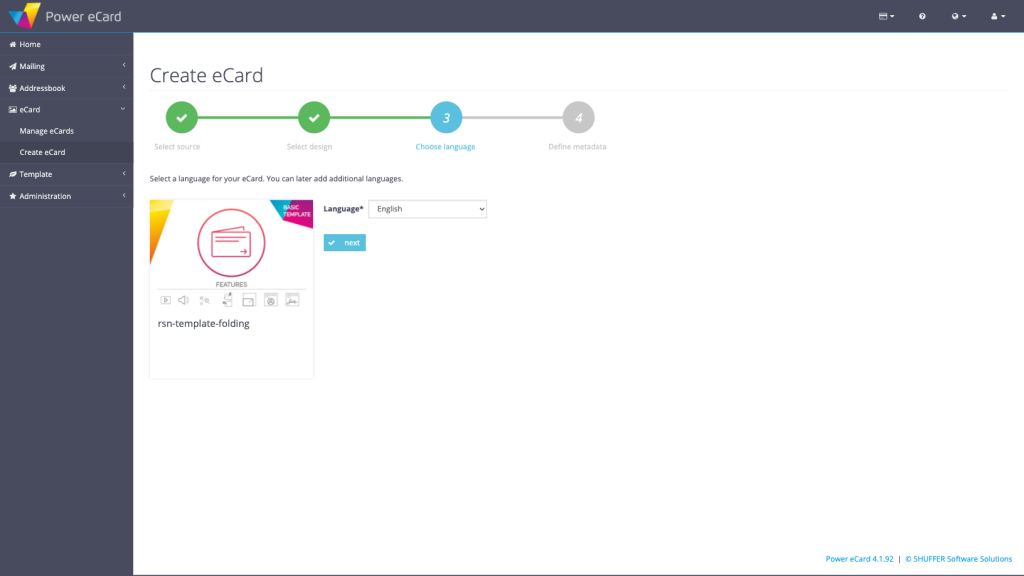
First, go to “eCard” in the menu bar on the left and then select the menu item “Create new eCard“. Choose the third option “Creat blank, new ecard” to select your template in the next step.

Here you can choose the template “rsn-template-folding“, to create your eCard as a folding card. Follow the instructions in steps 3 and 4 to select the (first) language of your eCard, assign a name and upload a preview image for the eCard.
Click on “Save” to complete the basic configuration of the eCard and go to the overview of the language versions of your eCard:
2. Create localization & Design eCard
Basic settings
Now you are in a window with 3 different tabs. First you define the basic settings with a few clicks, where you specify the appearance of the eCard itself and then the e-mail with which your virtual greeting card arrives at the recipient.
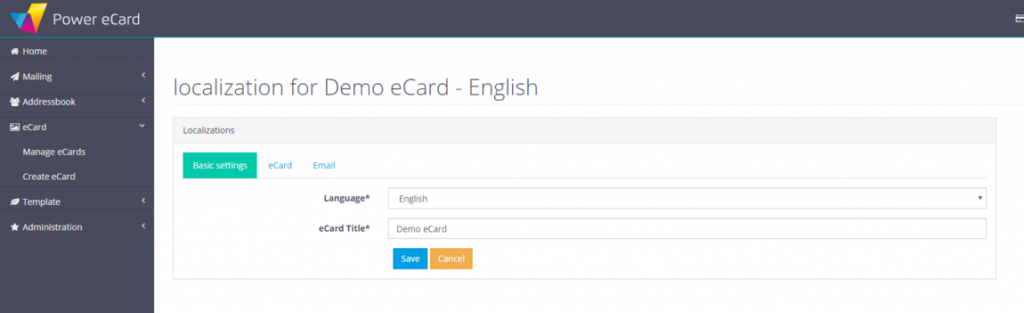
Language
First select the language of your eCard here. You can create several language versions for one eCard.
eCard title
The different language versions of your Power eCard can also be given different titles. You can also simply use the same name that you used as the “eCard name” before.
eCard
Next, click on the “eCard” tab. Here you have a wide range of options to create your own personal Power eCard.
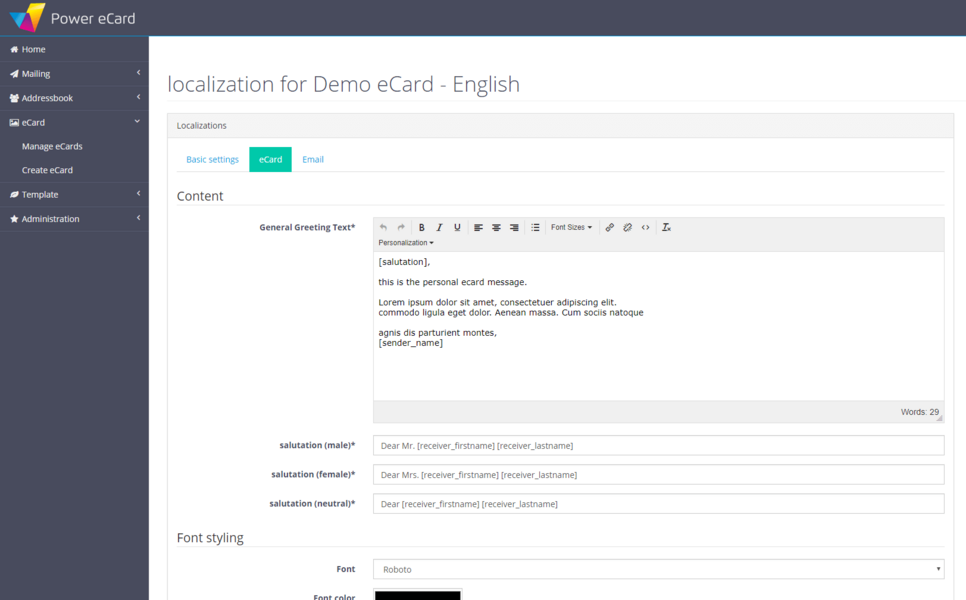
Content
In the text editor you will find a predefined greeting text, which you can of course customise according to your wishes. In addition to changing the content of the text, you also have various styling options
For example, you can mark your text bold, change the alignment, use enumerations or change the font size. This applies to the entire text as well as to individual passages. You can also insert links.
Personalization
With our system you can send the same eCard to a large number of recipients and still use a personalised salutation. This is ensured by the various markers under Personalization (shown in square brackets), which automatically extract the data from the address book when the mailing is sent and place it in the appropriate place on your greeting card.
In the standard text [salutation] creates the salutation from the following field and generates the sender with [sender-name] from your user data.
Salutation
In addition to the actual greeting text, you can also modify the Salutation. Since you can select a gender as well as a name for your recipients in the address book, the salutation can also be personalized according to gender.
Here, you can use the markers to adapt your salutation to suit your needs, too. If, for example, you only want to address the recipient with first names, use only the marker [receiver_firstname] – and vice versa. It is up to you whether you want to start with “Hello”, “Dear” or something completely different.
Font Design
You can use these fields to determine the font and color of your greeting text. You can see it later in the preview. We have integrated some fonts for you to choose from in our system. If you want a different font, we can optionally add it to your system.
User Graphics
In the user administration you have the possibility to upload your profile picture and a signature. These can now be placed on the eCard. Images appear above the text, the signature below.
Background
Now you have various options to determine the page background of your eCard. In the first two fields you can specify a color for the upper and lower background, which then run into each other. If you prefer a uniform opaque color, simply enter the same color value in both fields.
As a second option, you can upload a background image from your computer to the template that overwrites the background color. This must be in .jpg, .png or .gif format and should not exceed the maximum file size of 2 MB. For optimal display on conventional desktop PCs, we recommend an image size of 1280 x 1024 pixels. If available, you can also integrate a background video into your Power eCard. Please make sure that the video can be played in a loop, is not larger than 10 MB and is available in mp4 format. You may need to convert your video file.
Once you have defined the appearance of the page background, you can also integrate background music if you wish. The audio file provided for this purpose should be a maximum of 3 MB in size and must be in mp3 format.
eCard Size
You can now change the size of your eCard as required. This is defined in pixels. For example, you can design rectangular or square card formats. If you use image files for eCard design, you must enter the pixel size of your images here.
The inner distance determines the position of the text on your card, measured by the distance between the text and the edge of the card. Just try different values to see how the card layout changes.
If you confirm the option “Show device orientation hint” with a check mark, a hint appears on mobile devices to rotate the device for the optimal view. This is helpful, for example, if the recipient is viewing his eCard on his mobile phone or tablet. You can define the exact wording of the message text yourself in the label.
eCard Design
Here you are now in the design of the individual card pages. For the template “folding card” you need 3 different motives, which you can upload into the system as usual: The front side (cover), the back side when opening and the inside, on which the greeting text is written.
Alternatively, you can specify a background color for all three sides or select a transparent background. With the folding card, you also have the option of determining the folding direction of your eCard. Pay attention to format and file size of all images.
Effects
Under the effects you will find two optional animations that you can add to your virtual greeting card. You have the choice between a snow and a star animation, which runs over the background of the eCard. It is also possible to fade in both animations at the same time.
Navigation Elements
In the last step you can edit the navigation of the eCard. This informs the recipient that he or she can turn the page or open the card to see the content with the greeting text.
In our template there are two graphics for the arrows to scroll, alternatively you can of course use your own. It is also up to you to decide which text you want to use to ask the addressee to click.
At the bottom you have the possibility to save your Power eCard. This will take you back to the localisation overview. Under Actions, next to the blue button with the pencil symbol, you will find an orange one with one eye. With a click on this symbol you can display a preview of the eCard. If you notice points that you still want to change, you can do this any time by clicking on the pen button.
3. E-Mail Design
In the last step, you personalize the look and feel of the email with which your Power eCard is sent. To do this, go back to the edit mode and click on the third tab “E-Mail”.
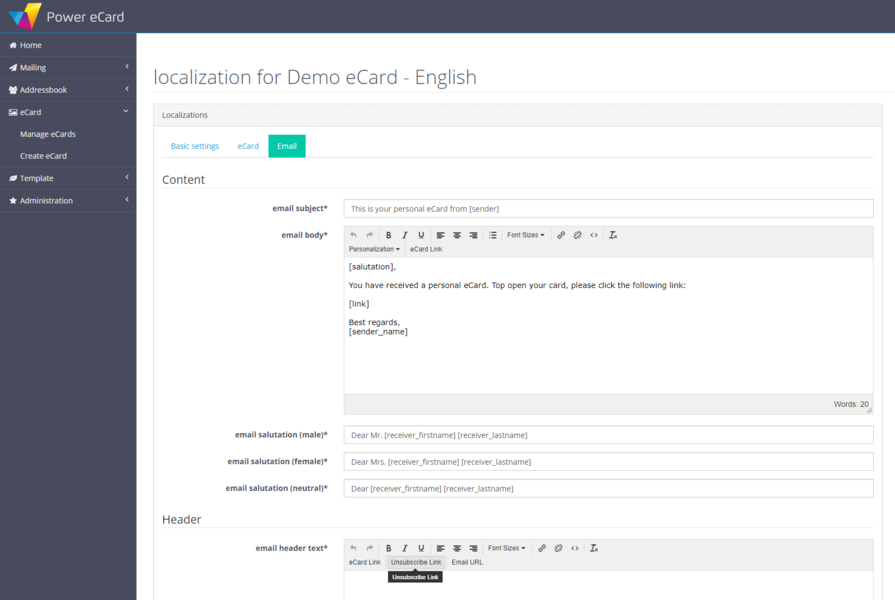
Content
This content field is basically identical to the one on the previous page. However, here you do not edit the greeting text of your eCard, but the text in the e-mail which comes with the eCard.
As before, you can also adapt the salutation to your wishes here, which will then be inserted in the [salutation] field in the e-mail. If you use the [sender] marker in the subject, the name of the user who sends the eCard will automatically be placed here. Optionally, you can manually enter a name or a company here – or select a completely different subject.
Footer
It is the area right beneath the footer of the mail. You can use this for example for imprint texts, contact data or unsubscribe options and also provide links if required. If you don’t need a footer, just leave this field empty.
In addition to the usual formatting options, you can also specify the color of the text and the color for links here.
Design
In order to graphically display the style of your e-mail, you have the option of including an image in the header and footer. The two elements form a frame that encloses the e-mail text. If you use our free template, you will also have image material which you can use. Optionally, you can also place a link on each of the two images. Use files under 2 MB with .jpg, .png or .gif extension.
The optimal image size is 600×300 px for the header and 600×80 px for the footer. Larger images will be scaled by our system to a width of 600 px and may not be displayed as desired.
Here you can also set the background color of your text area and the color of the area outside the writing area. The same applies to the font and font color, as well as the text color for links.
Button-Design
Finally, you can configure the button that opens the Power eCard. Select an inviting label to animate your recipient to click. If you change the font size, the length of the button will adjust automatically.
Color adjustments of the text and the button background are also possible here. If you like, you can give the button a different frame color, the thickness of the frame can also be varied. If you don’t need a frame around your link-button, then simply enter the value “0” for the frame thickness.
Now you have finished all necessary settings and created your Power eCard completely! Click on Save to return to the localization overview. Here you can use the button with the letter symbol – next to the eCard preview – to view your finished e-mail.